The Action List Visualizer is activated by clicking the Start Action
List Visualizer button  in the Action List
Editor. Once activated, a new toolset becomes available, as shown below.
in the Action List
Editor. Once activated, a new toolset becomes available, as shown below.
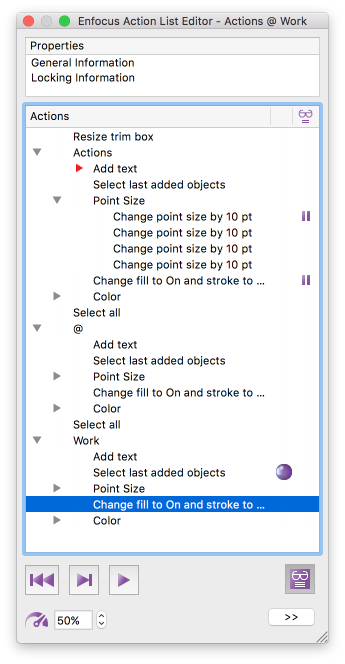
Buttons
| Button | Click this button to... |
|---|---|
 |
Quit the tool and return to the regular Action List Editor. This will bring back the buttons to add, remove, move, … the Actions in the Action List. |
 |
Restart the Action List Visualizer. This
places the pointer  again at the top of the Action List.
 |
 |
Execute the current Action (=Action with the pointer) and move the pointer to the next Action. |
 |
Run the Action List (starting from the
Action with the pointer). The Action List will be executed and stop at a breakpoint
(if there is any) or when you click the Pause button  , otherwise it
will run till the end. , otherwise it
will run till the end. |
 |
Pause the Action List (while it's running). |
 |
Change the processing speed. 10% is very slow, 100% is very fast. |
 |
Expand the details pane, which shows the attributes of the selected Action. |
Icons
| Icon | Meaning |
|---|---|
 |
Pointer, indicating which Action will be executed next. |
 |
Breakpoint. This is where processing will stop when the Action List is executed in Run mode. |
 |
Column where you can click to add or remove a breakpoint. |
Color indicators
Note that the green and purple indicators indicate which selection is involved in the selected Action, just like in normal working mode (see Using operators in Action Lists). In the above example, "Change fill to ON..." applies to "last added objects". During Action List visualization, when "select last added objects" is executed, it will be highlighted in purple in the document; purple because of the purple indicator. Other selections are marked in blue.