Overview
The following tutorial will step through the basics of using PitStop Pro. In this tutorial, you'll learn where the basic tools are located in PitStop Pro and how to work with Preflight Profiles to perform preflight checks and simple corrections.Tutorial objective
- The PitStop Pro Tools.
- Working with a Preflight Profile.
- Run a preflight check and make corrections.
- Editing a Preflight Profile.
Market application
Even with today's modern production techniques PDF files are still created incorrectly, problems such as incorrect page size, low resolution images, unwanted RGB images, lack of bleed and too much ink coverage still exist. These issues might always not be obvious on a computer monitor but they can become a huge problem later in the production process.Detecting these by preflight so they can be resolved before going to production is crucial in today's workflow and avoids losing time, upsetting customers or incurring costly reprints.
Tutorial length
This tutorial should take about 15 minutes.Tools needed
For this tutorial, you will need:- Enfocus PitStop Pro
- Kreatieve_Keuken.pdf tutorial file. The tutorial PDF is available for download at http://www.enfocus.com/webmarketing/files/Kreatieve_Keuken.pdf.
Part 1: Running a Preflight Profile and making a correction
- Open Acrobat Pro with PitStop Pro installed and activated.
- Open a copy of “Kreatieve_Keuken.pdf”.
- From within Acrobat Pro, open a copy the "Kreatieve_Keuken.pdf" document using the Open command.
Note: Work on a copy of the tutorial file so that you always have a clean original to go back to. Later tutorials require an original version. - Setting your Enfocus PitStop Pro Preferences.
- Open the Enfocus PitStop Pro Preferences found under the menu on Mac OS and on Windows OS.
- Select Show Navigator radio button in the
General category.
Once you're familiar with PitStop Pro you can change the preferences to suit your needs. We are only making this change for the tutorials in order to simplify the steps in the tutorial.
- Locating PitStop Pro tools.
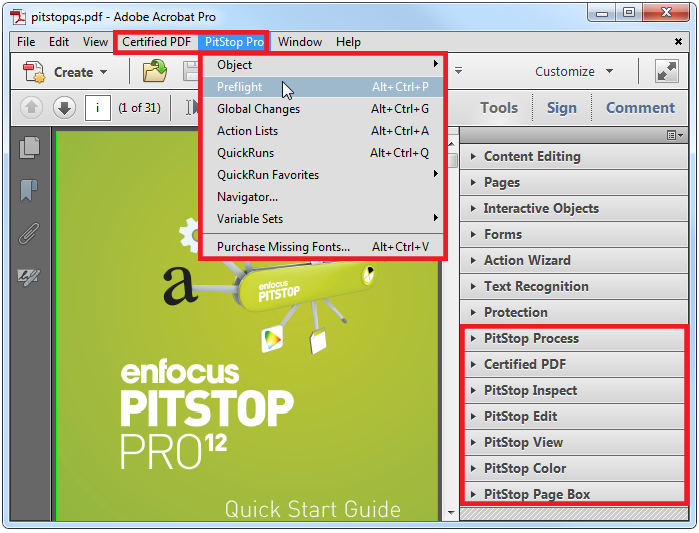
- There are two primary ways to access PitStop Pro tools in Acrobat X and XI. One is through
the PitStop Pro or Plug-Ins menu and the
other is under the Acrobat Tools side bar (outlined in red
below). Note that keyboard shortcuts are available to access common tools.
For more information on specific PitStop Pro tools or functions shown, see the PitStop Pro Reference manual.
- There are two primary ways to access PitStop Pro tools in Acrobat X and XI. One is through
the PitStop Pro or Plug-Ins menu and the
other is under the Acrobat Tools side bar (outlined in red
below). Note that keyboard shortcuts are available to access common tools.
- Working with Preflight Profiles.
- From the Enfocus PitStop Pro menu, select Preflight
Document...” to open the Preflight tools
window. You will see a list of preflight groups represented as folders.
From the list of available preflight groups, click on “Standard” and then the “Ghent PDF Workgroup” and the “2008 Specifications” subfolder. You will see a list of available Preflight Profile checks.
Select the “SheetCMYK_1v4” profile. At this point the Run button will become available. Note that you can change settings on what pages to run the profile on. In this case, we'll run the profile on the entire document.
Select the Run button to start the preflight on the tutorial document.
When the preflight check is complete, the Enfocus Navigator window will be displayed (this is based on the Preference settings made earlier). In the Enfocus Navigator, you will have a list of all Errors, Warnings and Fixes applied to the PDF based on the settings from within the preflight profile. From there, you can click on an item listed to highlight the affected area or element on the page and any fixes that are available for that item.
- From the Enfocus PitStop Pro menu, select Preflight
Document...” to open the Preflight tools
window. You will see a list of preflight groups represented as folders.
- Making a correction in Preflight.
- Click on the first Error "RGB color is used". Notice that when you click on this error,
one of the images causing the error is highlighted in the Acrobat preview.
Expand the selection to show the two objects causing the error. Click between the two to see both images causing the error. Then click back on the parent error so that our correction is applied to both images.
In the Enfocus Inspector, expand the “Solution” section if it is not already. Then click on “Add” to add a new color-remapping rule.Now set the settings to remap the Color Space, Device RGB to Color Space, Device CMYK. Then click the Ok button to add the remap settings into the Enfocus Navigator, you should see them appear in the interface and they should be highlighted.
Now click the Fix button and this remapping will be applied and the images will be corrected. Now close the Enfocus Navigator and run the same Preflight Profile again.
Notice that the RGB error does not appear in the Enfocus Navigator showing that the two RGB images have been changed to CMYK.
- Click on the first Error "RGB color is used". Notice that when you click on this error,
one of the images causing the error is highlighted in the Acrobat preview.
- Close the tutorial document without saving your changes.
Part 2: Creating your own Preflight Profile
PitStop Pro has many built-in predefined profiles based on industry standards. You can create your own Preflight Profiles based on an existing profile or create a totally new one from scratch. In this tutorial, we're going to create a new profile based on an existing one.- Open the Kreatieve_Keuken.pdf tutorial file in Acrobat Pro.
- Navigate to the Enfocus PitStop Pro menu and open the Enfocus Processing - Preflight. Then navigate to the Ghent PDF Workgroup profiles.
- Locate the "SheetCMYK_1v4" profile under the 2008 Specifications profiles. Double click
on the profile to edit this profile. This will display the Enfocus Preflight
Profile Editor dialog.
The Enfocus Preflight Profile Editor shows all available checks along with what is already activated within that check. By clicking on the different options on the left side of the dialog, you will then see a list of checks already active in that check, as well as checks available that can be added.
- In the General category, change the Name to "Tutorial Profile".
- In the Color category notice that there are already some checks
active.In the Available Checks list (list of checks on the right side of the window), double click on the second check, "Color: RGB". This will add the check to the bottom of the active checks.Note: Notice that some checks are grayed out once added and some remain selectable to add. This is because some checks can be added multiple times to check different elements of the page.Scroll down and double click on "Convert to CMYK". This will tell PitStop Pro to convert any RGB object to CMYK automatically when this profile is run.Note: PitStop Pro uses the color management preferences set in the Enfocus PitStop Pro Preferences or you can change the color management settings within the Preflight Profile using the Color Management option in Enfocus Preflight Profile Editor, when editing a profile.
- Click OK button to close the dialog and save your changes.
After clicking OK button a warning message will be displayed asking you if you'd like to save the profile locally. This is because all the built-in profiles are "read only" and if you want to save your own profiles, they will be saved on the local machine.
Click OK button to save the new profile. It will be listed at the end of your Local checks.Note: To create an all new profile select the Action menu in the upper right corner of the Enfocus Processing - Preflight window and select from the menus. - Select the new profile from your Local checks and run the profile on the tutorial
PDF.
When processing is complete and the Enfocus Navigator is displayed, scroll through the list of warnings and fixes to locate: "Remapped Device RGB color space to Device CMYK color space."
Click on this fix to view the objects affected by this fix. You will see that the RGB images from the first part of the tutorial are now automatically changed to CMYK.
- Close the tutorial document without saving your changes.