Overview
The following tutorial will give you an introduction to working with a variety of tools in PitStop Pro. Understanding what the different tools do and how they relate to each other will help you be more efficient with PitStop Pro.Tutorial objective
To make minor corrections before final print production. In this tutorial you will learn how to:- How to manually change an image from RGB to CMYK.
- Use Global Changes to auto-detect the trim page size.
- Use Global Changes to extend object bleeds.
- Use text search and replace to update publication date.
- Use Action List to remove application marks.
- Use Global Changes to add a custom text mark.
Market application
Often minor changes need to be done on a PDF file before production or distribution. In this scenario, we will be preparing our tutorial document for final printing by ensuring elements are in the right color space, correcting bleeds and removing application marks so they don't interfere marks added by a prepress system.Tutorial length
This tutorial should take about 15 minutes.Tools needed
For this tutorial, you will need:- Enfocus PitStop Pro
- Kreatieve_Keuken.PDF tutorial file. The tutorial PDF is available for download at http://www.enfocus.com/webmarketing/files/Kreatieve_Keuken.pdf.
- Successfully completed Tutorial 1.
Steps to recreate
- Open the file "Kreatieve_Keuken.PDF" in Acrobat Pro.
- Open Enfocus Processing - Preflight and run the "SheetCMYK_1v4" from the Ghent PDF Workgroup 2008 Specification set (details covered in Tutorial 1).
- Click on the first error "RGB color is used". Notice that when you click on this error, one
of the images causing the error is highlighted in the Acrobat preview.
Expand the selection to show the two objects causing the error. Click between the two to see both images causing the error. Take notice which images are RGB.
As you saw with Tutorial 1 we can correct the images directly from preflight, however, this time we’re going to use the Enfocus Inspector to correct our images.This can be useful when you want more control over which elements of a page are changed or if you already know an element needs correction.
- Close the Enfocus Inspector and Enfocus Processing - Preflight windows.
- Under the Acrobat Tools, select PitStop Inspect to view the tools available. Click on the selection tool and then select the RGB image from the cover page of the tutorial file.
- Open the Enfocus Inspector. With the Enfocus Inspector open, click on the first toolset, Fill and Stroke. Notice that with the image selected, it shows that the image is RGB color.
- Change the color model from RGB to CMYK. From the Actions menu (upper
right-hand portion of most PitStop Pro Windows and functions), select Convert to
CMYK (using Preferences) to change the color model for this image.Note: Because this is a continuous tone image and not a object fill you can not modify the image pixels within the inspector. However, if you select an object like the text “KOFFIE” below the image, you'll see that you can modify the colors by moving the sliders.
Feel free to explore the Inspector by selecting different elements on the page and different functions within the Inspector. You will see that the values returned within the Inspector change depending on the type of object you select in the PDF file.
- Close the Enfocus Inspector.
- Viewing and setting the Page Box.
In this step, we're going to check to make sure we have a proper Page Box defined for our PDF. This will be important for downstream applications such as imposition programs that use the Trim box to align pages.
From the Acrobat Tools pallet, select PitStop View and select the Show Page Box tool.
With the Show Page Box enabled, you'll see a red outline surround the page and nothing aligned with the crop marks indicating there is no trim box detected in this PDF document.
From the Acrobat Tools pallet, select PitStop Process and select the Global Changes tool.
Global Changes allow you to apply fixes and corrections to an element, page or entire document with a single click. Each Global Change is predefined within PitStop Pro and performs a specific function. However, many Global Changes have user options and can be customized for your needs.
With the Global Changes window displayed, navigate to Page section and expand it. Double click on the last option Set Page Boxes to Marks.
With Set Page Boxes Open review the options available for this function. You'll see that PitStop Pro provides some flexibility to find page marks using several variations of color or color build. Also, if crop marks have been manually added to the layout, they may not be perfectly aligned — Allowed Marks Position Deviation value will allow for this misalignment. However, it is not needed in this particular PDF.
- Close the Set Page Box to Marks window and run the Global Change on
the entire document.
Select the Set Page Box to Marks function, check to be sure it is set to run on the "Entire document" and click Run button.
When complete, you will see the Blue page box guides aligned perfectly with each crop mark.
With this Global Change applied, the document now has a page box defined allowing for bleeds to be managed.
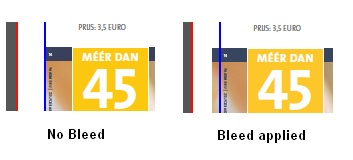
- Extending bleeds within your document.
Next we will apply a Global Change to extend the bleeds beyond the page box. Zoom out on the first page within Acrobat so you can see the entire layout. Notice that elements on the page do not bleed on the left side of the document.
- Open PitStop Process under the Acrobat Tools and click on Global Changes.
- Under the Page category double click on Extend
Bleed.
This will open the Enfocus Global Change Editor for Extend Bleed. For Bleed beyond the trim box enter the value "0.125 in" (or 3 mm) for the bleed amount.
Click Run button to apply the new value.
Notice that nothing changes. There are two reasons images may not bleed when this Global change is run. One is that no image data exists and the image data actually stops at the edge of the page. This does not affect graphic (vector) objects as the object can be extended. The other reason is the image is not exactly ending on the page trim box, yet there is cropped image data to extend into the bleed.
To check which condition exists; reopen the "Extend Bleed" Global Change.
For the Distance to trim box enter the value "2 pt". Be sure your Bleed beyond trim box is still "0.125 in" (3mm) and click Run.
Now you will see the image and graphic objects extend beyond the trim box.
- Updating the publication date with Search and Replace.
The next change will use the Enfocus Find And Replace Text function to update the publication year.
From the PitStop Pro menu, select Object and Enfocus Find And Replace Text from the extended menu.
Enter "2004" in the Find textbox and enter "2012" in the Replace textbox. Now click the Next button to find the first occurrence of "2004". It will be highlighted with an underline.
Click the Replace Find button to replace the current value and find the next occurrence for replacement. Continue to click the Replace Find button until the end to the document is reached.
- Removing Application Marks
In this step we want to remove marks and slug lines added by the user or the layout application. For this, an Action List will be used.
From Acrobat Tools, select PitStop Process and click Action Lists.
Action Lists are the most powerful functions within PitStop Pro. They can be a combination of actions, Preflight Profiles, and Global Changes arranged into a single function. PitStop Pro offers many preinstalled functions that can be edited and modified to meet your needs. See the Reference manual for more information on Action Lists.
Scroll to Page, select Remove Printer Marks and click the Run button. All the marks and slug lines outside the Trim Box will be removed.
- Switch back to Global Changes to add a custom slug line.
With the printer marks removed, we will add our own slug line to the page.
- Scroll to and double click the Add Variable Text Global Change
function for editing.
For this Global Change, we want to be able to add a text string indicating the current document name and the page number of the document in the lower left-hand corner of the page outside the trim box and bleed area.
- Under the Text Settings section, click the Use Variable... button to bring up the Use Variable dialog.
- Select "%Current Document Name%" by double clicking on it, then type in a separator like a dash (—) in the Enfocus Global Change Editor window.
- Click the Use Variable button again to insert "%Page Number%".
- Enter "of" after that and insert the final variable of "%Page Count%".
- The final string should look like this: %Current Document Name% — %Page Number% of %Page Count%.
- Next, change the font size to 9 points and leave the color set to gray.
- Under the Position section, configure the statement to look like this: Place the lower left of the text relative to the lower left of the trim box with and offset of X 0.25 in (7mm), Y -0.25 in (7mm).
- Click the Save and Run button to apply the slug lines to all pages of the file. This completes the tutorial.
- Scroll to and double click the Add Variable Text Global Change
function for editing.
- Close the tutorial document without saving your changes.