This topic explains how to create a basic flow, which sends all input files first to an intermediate folder and then sorts them into two categories (PDFs versus all other files).
- Open Switch.
-
Create a new blank flow and rename it to Tutorial 1
Flow.
- Create a new blank flow.
- Make sure the flow is selected and in the Properties pane, click the Name field.
- Replace New flow 1 with Tutorial 1 Flow.
-
Add a Folder flow element (for the input), and configure the properties as
required.
In this exercise, the input folder should be named Input1 and linked to
a physical folder on your desktop.
- From the Flow elements pane, select the Folder flow element and drag it onto the blank flow canvas. As you drag the item onto the flow canvas, you should see it drag with your cursor. You should place it on the left side of the canvas.
- Select the folder on the canvas.
- Change the name in the Properties pane to Input 1.
-
Link the Folder element to a physical folder on your desktop.
- Make sure that the new folder is still selected.
- In the Properties pane, click Path.
- Click
 .
. - Select Choose folder.
- Select Create new and create a new folder on your desktop called Input flow 1.
- Click Select folder.
Note: With a production workflow, the folder being linked to can be anywhere on the network. As long as the Switch Server can access the shared volume, it can link to the folder. - Add a second folder. Name this folder Sort for PDF. This will remain an Auto-managed folder. We recommend using auto-managed folders for intermediate folders within a workflow, so files are not moved unnecessarily over the network.
- Add two more folders to the upper right and lower right of the Sort for PDF folder. Name the top folder PDFs and the bottom folder All other files.
-
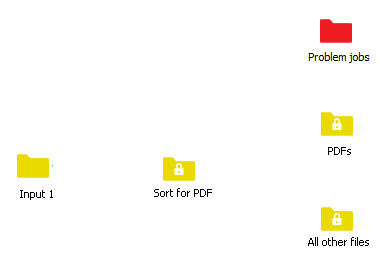
To take care of files that (for any reason) cannot be processed, add a Problem jobs flow element.
Your flow now looks like this:
-
Connect your Folder elements (but not the Problem jobs element!).
- Double-click the Input 1 folder. A connection appears.
- Move your cursor to the Sort for PDF folder and click that folder. A connection is made between the two folders.
- Make a similar connection from Sort for PDF to the PDFs folder and the All other files folder.
Note: Always start a connection with the folder from where the files will "flow from" and then connect to the folder they will move to. Connections have a direction of flow noted by the arrow in the middle of the connection.Your flow now looks like this: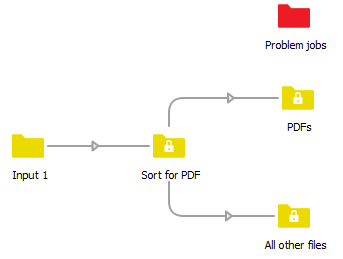
-
Now change the connection settings, to make sure that PDF files are moved to
the PDFs folder, and all other files to the All other files
folder.
- Click the connection between the Sort for PDF and PDFs folder. The connection highlights in dark gray.
- In the Properties pane, select the Include these jobs property.
-
Click
 and select Define file types from the pop-up
menu.
and select Define file types from the pop-up
menu.
- In the Define file types: Include these jobs dialog, select Adobe PDF (*.pdf).
- To add it to the include list (right side), click Add.
- Click OK.
- Click the connection between the Sort for PDF and All other jobs folder.
- In the Properties pane, select the Include these jobs property.
-
Click
and select All other jobs from the pop-up
menu.
- Save the flow. To do so, click the Save Flow button at the top of the design window.
-
Activate the flow.
To do so, click the Activate Flow button at the top of
the design window.
The design window with the flow should turn gray with numbers showing "0" for each folder in the flow. The numbers tell you how many files are in that folder at any given time.
Your flow now looks like this: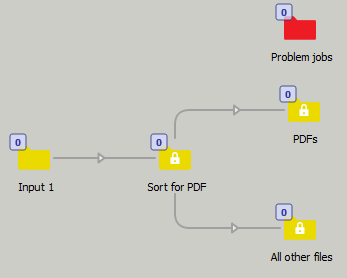
-
Drop your test files in the flow input folder on your desktop.
You can use your own files (PDF and non-PDF) or you can use the sample files found in "Tutorial Job Folder" folder.
Switch will recognize these files within 10 seconds (which is the default scanning time for an input folder) and you will see the counter change to match the number of files in the folder. Shortly after, the end folder counters will increment with the proper number of files depending on the sorting. -
To check the results, click the PDFs folder or the All other
files folder.
In the Jobs pane you can view what files are in these folders. PDFs
should be in the PDFs folder and all other file types should be in the
All other files folder. If they are not, then double-check the
Connection settings (see step 7) and try the flow again.Note: You can delete files from the output folders by clicking the file name in the Jobs pane and pressing the Delete key.