This topic explains how to create a flow where:
- A new client job or job folder is recognized within a client input folder (in this example: Server/Client/Incoming).
- The job is processed in Switch.
- The processed files are placed back in an outgoing folder for client review (in this example: Server/Client/Completed).
- Place Tutorial 3 Desktop Folder on your desktop. This will be used to simulate a network server folder structure.
- Create a new blank flow and rename it to Tutorial 3A Flow.
- From the Flow elements pane, select and drag a Submit Hierarchy flow element onto the canvas.
-
In the Properties pane (with Submit Hierarchy selected), rename the flow
element and define the actual location of the input files.
You should indicate the top-level (level 0), the number of sublevels to be checked by Switch, the folder names that should be included or excluded, and whether or not the folder hierarchy should be remembered.
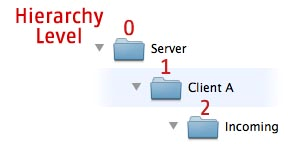
In this example, Switch should pick up input from the Incoming folder of each Client folder (see image).- To rename the Submit Hierarchy element to a meaningful name, set Name to From Server.
- To define the top-level directory path, select Path and Choose folder from the pop-up menu. Select the Server directory from the Tutorial 3 Desktop Folder.
- To have Switch look two levels deep, set Subfolder levels to 2.
-
To have Switch look for folder names starting with the string
Incomin, but only on level 2:
- Set Adjusted by (rule 1) to Excluding folders not named.
- Set Folder name to Define folder patterns and enter Incomin* as value.
- Set On levels to 2.
- To have Switch remember the complete path back where the job came from, set Attach hierarchy info to Yes. This information will be added to the job as private data (metadata) within Switch.
- Set Include subfolder levels to 2. Since this is the same level Switch is looking for files, this will have Switch remember the entire hierarchy. It can be modified later.
-
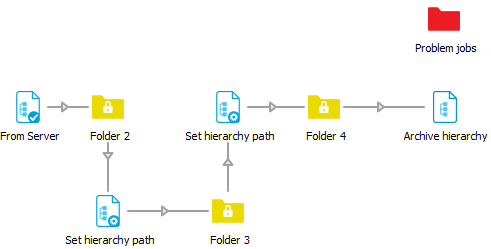
Mimic the flow below, by adding flow elements and connecting them.
-
Define a new location for the processed files.
Note: The Set hierarchy path flow elements are used to build a new location path, based on the original path. In this example, the original path is Server/Client/Incoming; the new path should be Server/Client/Completed.
-
In the Properties pane of the first Set hierarchy path element:
- To remove Incoming from the original location path, set Action to Remove.
- To indicate the level of the hierarchy that will be removed (in
this example: the second level, being Incoming), set
Start index and End
index to 2.
This will change the path from Server - <Client> - Incoming to Server - <Client>.
-
In the Properties of the second Set hierarchy path
element:
- To add a segment at the end of the hierarchy path, set Action to Add at the bottom.
- To enter a name for the new segment, click Path segment 1 and select Inline value from the pop-up menu.
- Enter a name, in this example: Completed.
-
In the Properties pane of the first Set hierarchy path element:
-
Now define the properties for the Archive hierarchy element.
- Set the Path to the original input location (see the Server element in your flow).
- Change Subfolder levels to 3. The Subfolder level indicates the number of subfolder levels to be created. The embedded hierarchy will make sure that the original position is maintained (i.e. that files are stored in the correct Client folder), while taking into account the changes made in "Set hierarchy path" (i.e. so that output files are placed in the Completed instead of the Incoming folder).
- To maintain the file original names, set Strip unique name to Yes. This means that the unique prefix name added to the file name by Switch is removed before placing the job in the archive hierarchy.
- To indicate what should happen in case of duplicate file names, choose a value for Duplicates, for example: Overwrite.
-
Check the result.
- Save and activate the flow.
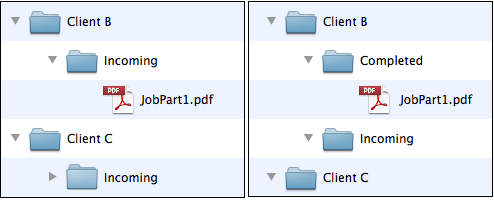
- Place a new job in one of the input folder (e.g. in Server/Client B/Incoming). This can be a folder or a single file (any file can be used).
- Check the output. The output should be found in a new subfolder of the same Client folder (e.g. in Server/Client B/Completed).
Note: If you need to access a secure FTP server to receive your files, the procedure
is similar. However, you will need to use FTP Receive (instead of Submit
Hierarchy) and FTP Send (instead of Archive Hierarchy).