Thus far all folders we created are "auto-managed"; this means their location is managed by Switch. This makes it very hard to allow users to drop files into such folders as their location might change or might not be accessible to network users.
The solution to this is to create a "user-managed" folder for our drop folder. This will be a folder on the network (or local computer) in a location that we can publish to our other users in the network so that they can drop files in the flow.
- Begin by dragging one more folder on the canvas, to the left of your flow.
- Rename the folder "Drop Folder" and connect it to the "Input Folder".
- Make sure the drop folder is selected in the canvas
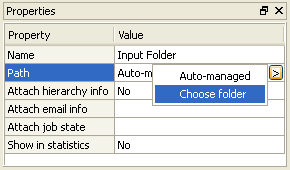
- Click on the "Path" property in the properties pane
- Click on the arrow that appears on the right hand side of the property.
-
Select the "Choose folder" option
A "Browse for folder" dialog window appears where you can select a folder on your computer or somewhere on the local network (as long as it is accessible from your computer).
- Select the folder you want to use as drop folder
- Click "OK" to set the property value.
You can use this alternative way to create the drop folder: In the folders pane, browse to the folder you want to use as drop folder. Click on that folder in the folders pane and drag it onto the canvas. When you drop the folder on the canvas, Switch automatically creates a user-managed folder for you.