Managing files through the Switch Web Portal requires a particular flow design in Switch.
About flows in Switch
To design a flow, the Switch user drags flow elements (such as Submit points, processors and folders) on the canvas and connects them according to the desired job flow. After configuring appropriate property values for each flow element (and in some cases, the connections), the Switch user can activate the flow for execution. From then on, Switch automatically moves and processes jobs along the flow.
If you're new to Switch, we recommend having a look at the Switch Quick Start Guide (available on the Enfocus website).
Dedicated flow elements
Submit points and Checkpoints are flow elements designed for use with the Switch Web Portal. For more information, refer to the description under Flow elements: overview > Communication.
- Make sure the flows you want to use with the Switch Web Portal are active. A user with the appropriate access rights can access Submit points, Checkpoints and jobs in inactive flows but the jobs will not move along the flow.
- The Switch Web Portal only interacts with the Switch Server, not with the Switch Designer. Users can safely quit the Designer without disturbing the operations via the Portal as long as the Switch server is running. For more info on the behavior of Switch when exiting the flow designer, refer to the Switch user preferences (User interface).
Example flow
Here's a flow example as it is shown on the Switch canvas:
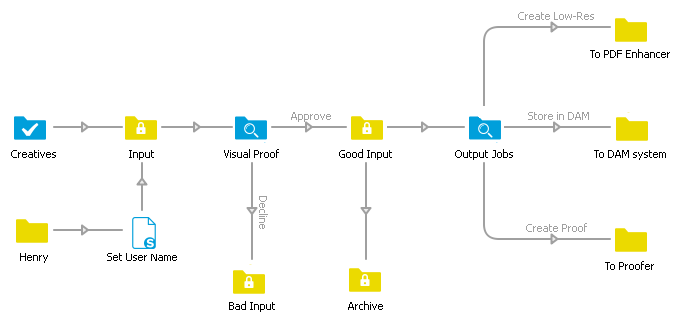
Since this example focuses on Web Portal features, there is a lot of interaction with human operators and little automated processing (other than moving jobs around). Real-life flows would probably include processing steps such as preflight or color conversion.
The Submit point on the left (Creatives) allows submitting jobs to the flow in a controlled way using the Switch Web Portal. The user's name is automatically remembered; multiple users can use the same Submit point since each user is identified to Switch through his/her user name and password. The "Set User Name" script serves to add a user name for jobs submitted through a regular hot folder (Henry).
The first Checkpoint (Visual Proof) holds the incoming jobs for inspection by a user through the Switch Web Portal. The user will see the names of the output connections (Approve and Decline) as buttons in the job card. Pressing one of these buttons moves a job along the corresponding connection.
The second Checkpoint (Output Jobs) allows a Switch Web Portal user to decide how the jobs will be stored or processed. This Checkpoint is configured to allow multiple outputs at the same time; for example both "Store in DAM" and "Create Proof".
Setting up a Submit point
When setting up a Submit point (Creatives in the example flow), you can configure it in such a way that the user must enter one or more data fields before submitting a job to this Submit point. The entered values are associated with the job as metadata.
- Set Enter metadata to Yes.
- Double-click the Metadata fields property and define the metadata fields for which the user should provide a value, for example a Job ID and the date of submission.
- The Dataset name field is completed automatically. This is the name
of the dataset that will be created containing the contents of the metadata fields entered by
the user.
For a full description, refer to 'Defining metadata fields'.
The following screenshot shows how a user will have to enter the data (Job ID and Date) configured in the Submit point.

Setting up a Checkpoint
Similarly, when setting up a Checkpoint (Visual Proof and Output Jobs in the example flow), you can ask Switch to display additional information about the job, and the user may be asked to enter additional data fields before acknowledging a job. (This is the case if the Enter and display metadata property is set).
Furthermore, the output connections of the Checkpoint determine which buttons will be shown to the user for acknowledging a job.
For example, the Visual Proof Checkpoint in the example flow is configured in such a way that the user will see two radio buttons ('Decline' and 'Approve', named after the connections); clicking one of the buttons causes the job to move along the corresponding connection. This is the default behavior of a Checkpoint if two output connections are defined and no metadata has been enabled.

On the other hand, the Output Jobs Checkpoint in the example flow is configured in such a way that the user can select more than one option, causing a duplicate of the job to be sent out over each of those connections. This is possible if the Allow multiple outputs property is enabled.
In this example, the user that has to review the files will see 3 checkboxes (the names come from the output connections in Switch) and can select one, two, or three checkboxes as required.

For an overview of all properties, refer to the description of the Checkpoint flow element.
Metadata in Submit points and Checkpoints - default values
When defining the default values for the metadata fields, you can use a number of variables that automatically retrieve information from the machine that is used to submit or check jobs. As a consequence, this information does not need to be entered explicitly by the user; it can even be sent along with the job without being displayed.
- [Connection.Email]
- [Connection.FullUserName]
- [Connection.IP]
- [Connection.UserName]
- The Switch Web Portal requests the default value of the metadata fields, being a connection variable.
- Switch Server sends the connection variable e.g. [Connection.IP] to the Portal.
- The Portal replaces the variable with its actual value and sends the actual value along with the job back to Switch Server.
Use case: To keep track of the clients used to submits jobs, you could configure a metadata field "IP address" and set the default to [Connection.IP]. When a file is submitted, the IP address of the system used to submit this file is entered automatically and sent along with the job. It depends on the metadata field properties whether or not this field (with the actual value) is shown to the user and whether or not it can be changed.
Re-using metadata fields from a Submit point in a Checkpoint
Switch provides an easy way to re-use the metadata fields defined for Submit points in a particular Checkpoint.
To re-use an existing metadata field, simply click the  button (instead of the green plus button) in the Define metadata fields
dialog. This will open a dialog like the one shown below.
button (instead of the green plus button) in the Define metadata fields
dialog. This will open a dialog like the one shown below.
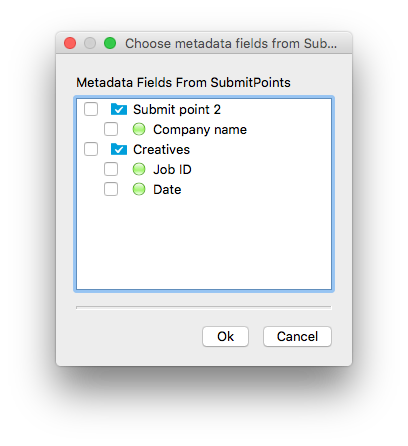
You can now select the metadata fields you want to re-use (based on the Submit points defined for the current flow). Note that the added metadata fields have only two editable options: Read only (yes/no) and Display metadata field (yes/no). The other options are grayed out and cannot be changed.
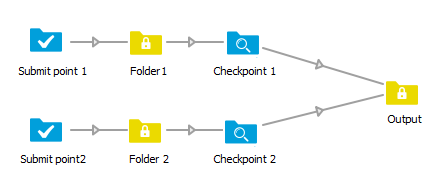
Remark: Although all Submit points present in the flow are shown, you must keep in mind that only the Submit point that is used for the job will send metadata. Refer to the example below: since all jobs in Checkpoint 1 come from Submit point 1, it does not make sense to add metadata from Submit point 2 to Checkpoint 1 (and vice versa).
If configured incorrectly, the connection variables (if used) will not be replaced with the actual values (users will see e.g. [Connection.UserName]) and metadata fields for which there is no value entered will be blank.
If configured correctly, when checking the Alert job on the Portal, the connection variables
(if used) will be replaced with the actual values (e.g. EAW13DL399 instead of the
[Connection.IP]) and the metadata fields that were completed at the time of submission will show
the entered data.