When Switch Designer is launched for the first time, the following window (ie. the workspace)
is displayed.
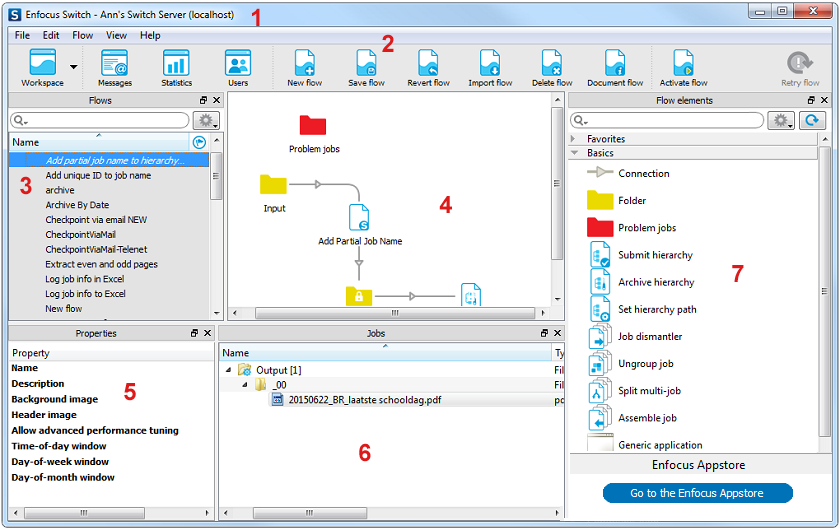
It consists of a title bar and a menu/toolbar (#1 en #2) at the top, and a number of panes
(#3,#5,#6,#7) surrounding a central area, the canvas (#4). The table below gives a brief
description of each of these screen parts.
| Screen part | Function | |
|---|---|---|
| 1 | Title bar | Indicates whether or not you are connected locally or remotely. E.g. Ann’s Switch Server (localhost) indicates that the Switch Server (in this example called Ann’s Switch Server) is launched locally. The name of the Switch Server can be changed by selecting (Windows) or (Mac OS). |
| 2 | Menu/Toolbar |
The menu bar gives access to the different panes and functions of Switch; for some of the
main functions a shortcut, i.e. a button is available in the toolbar:
Note: Not all buttons are available in all views. The above described buttons are displayed
in the default Workspace - Design view.
|
| 3 | Flows pane |
Gives an overview of the flows in your workspace. The selected flow is shown on the canvas (#4). The properties of the selected flow are shown in the Properties pane (#5). |
| 4 | Canvas | Gives a visual representation of your flow and allows you to design flows. |
| 5 | Properties pane |
Gives an overview of the properties of the flow selected in the Flows pane (#3) or the flow element selected on the Canvas (#4). |
| 6 | Jobs pane | Shows the content of the backing folder of a selected flow element. This allows you to see which files are where in the flow. |
| 7 | Flow elements pane |
Contains all flow elements (including built-in tools, installed apps and configurators) that can be used for designing flows. Note: The number of flow elements depends on the modules you have licensed. For example,
the Configurator elements are only available if you have licensed the Configurator
module.
When using the search function, matching results in the Enfocus Appstore are
displayed at the bottom of the pane. |