
Checkpoint via mail is a processor that allows implementing a simple Checkpoint via e-mail, performing the following main functions:
-
For each arriving job, send out an e-mail message that includes the unique name prefix of the job and a list of possible "Checkpoint actions" (the names of the outgoing connections, or, if no name is specified, the name of the target folders) – in addition to instructions on how to operate the Checkpoint by return e-mail.
-
Monitor e-mail messages coming back from users and parse those messages for the original information about the job and for the Checkpoint action selected by the sender.
-
When a matching response comes in, move the corresponding job along the specified outgoing connection or (if no name is specified for the connection) to the specified target folder.
Keywords
If you enter one of the following keywords in the Search field at the top of the Flow elements pane, the Checkpoint via mail element will be shown in the list:
- Internet
- web
- network
- communication
- transfer
- interaction
- client
- user
Connections
Checkpoint allows any number of outgoing move connections. Each connection defines a "Checkpoint action".
Properties
Property |
Description |
|---|---|
Name |
The name of the flow element displayed in the canvas. |
Description |
A description of the flow element displayed in the canvas. This description is also shown in the tooltip that appears when moving your cursor over the flow element. |
Subject |
The subject line for the message that will be sent as soon as a job arrives in the folder just before the Checkpoint via email tool in the flow. |
To addresses |
The list of destination e-mail addresses for the message. E-mail addresses are separated by a semicolon or by a newline. The to address typically contains the email address of the customer who has to take a decision (e.g. accept or refuse the file). |
Include attached addresses |
If set to Yes, the email addresses from the job's internal job ticket are added to the To addresses. For more information about attached email info, refer to Using email info in Switch. |
Reply address |
The e-mail address to which a receiver of the message should send a reply. If the value is empty or Default, the sender address specified in the Switch preferences is used. See Switch preferences: Mail send. Note: The value of this property is used in the
Reply-To SMTP header that is
normally used by email client applications to send a reply.
However, the From field of an email
in the client application does not display this address,
instead it shows the sender address specified in the Switch
preferences. See Switch preferences: Mail send.
|
Message format |
The format of the message that will be sent, either Plain text or HTML. Note: Make sure to choose the correct format for the selected
body template (next field), e.g. if you upload an HTML
template, you should select HTML.
|
Body template |
The location of the template of the e-mail body:
|
Attach files |
If set to Yes, the incoming job is attached to the e-mail message that is sent out. This is useful if the customer should review the job. |
Enable report viewing |
If set to Yes, the metadata dataset indicated with the subordinate property is attached to the e-mail message that is sent out. |
Report dataset name |
The name of the dataset to be attached to the e-mail message. |
Report name suffix |
The name of the attached report is formed by adding this suffix to the name of the job, before the file name extension. |
Report name extension |
The file name extension for the report. Select "Data Model" to automatically use XML, JDF or XMP depending on the data model of the exported data set. For the Opaque data model, the original backing file's extension is used. |
Allow multiple outputs |
If set to Yes, the user can send copies of a job along more than one outgoing connection; otherwise the job is sent along exactly one of the outgoing connections. |
Server type |
The type of server from which to retrieve email. Choices are POP3 and IMAP. |
Server address |
The URL or IP address of the server from which Switch retrieves e-mail (to check the customer's reply). Tip: You can find the POP3 or IMAP settings of your
mail provider (e.g. gmail) on the internet. Note that
POP3/IMAP must be enabled on your mail account. For more
information, refer to the documentation of your mail
provider.
|
| Port | Specify the port to be used for communication with the server (as specified in the POP3/IMAP settings of your mail provider) |
Accounts |
A list of accounts (names and corresponding passwords) from which to retrieve e-mail. This is usally your own account (as set in the Switch user preferences). |
Use secure password verification |
Defines whether to log in to the e-mail server using secure password verification. |
Server requires secure connection |
Defines whether the e-mail server requires a secure connection using the TLS protocol. |
| Check every (minutes) | The frequency of checking the e-mail accounts for new messages. |
| Fail jobs after timeout |
If set to Yes, jobs are failed after residing in the Checkpoint for a certain period of time (specified in the subordinate properties). Failed jobs are moved to the outgoing connection specified in the subordinate properties or to the Problem jobs folder. |
| Unit | Selects the unit for the subsequent property: Minutes, Hours, Days. |
| Timeout delay | The timeout delay in the units indicated by the previous property (0 means ‘no timeout'). |
| Fail connection |
The name of the connection to which failed jobs must be moved. If this property value is empty or if the specified name does not match any of the outgoing connection names, failed jobs are moved to the Problem jobs folder. |
Reply syntax
The user's reply message must specify the job ID and the selected Checkpoint action(s) in a simple format. Specifically, Switch searches for the following character sequences:
"Job identifier:" followed by the job ID (as specified in the original e-mail sent to the customer).
"Action:" followed by one of the Checkpoint action names, or a list of comma-separated action names (in case multiple actions are allowed).
In both cases, the text is case insensitive. All other text in the message is ignored.
Example flow
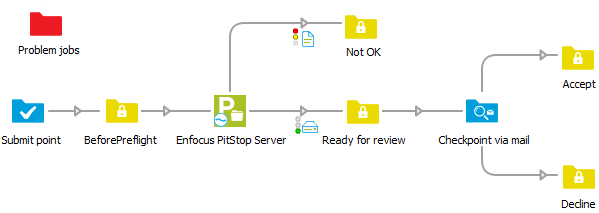
In the above example, jobs are submitted via a Submit point. They are preflighted using Enfocus PitStop Server, and moved to two separate folders, depending on the outcome of the preflighting.
- As soon as a job arrives in Ready for review, a message is sent to the customer (i.e. to the email address in the To addresses property of Checkpoint via mail) - see the example mail below.
- The customer has the chance to review the job (optionally, the job files are attached to the email) and sends back a reply that contains the job ID and the Checkpoint action of his choice (Accept or Decline) in the specified format- see the example reply below.
- As soon as Switch receives the reply, the job that was waiting in the Ready for review folder is moved to the corresponding folder.
Example Mail

Example Reply
